Adventures in abstraction with Rust's embedded-hal
Introduction
When I first looked at the Rust programming language in 2019, I was surprised by the already extensive support for embedded systems programming. I happen to have an STM32F3DISCOVERY, so I worked through the Getting Started chapter of The Embedded Rust Book. Then I noticed that Rust has a common set of traits (interfaces) for building hardware abstraction layers: the embedded-hal crate (Rust’s name for libraries).
One implementation in particular caught my eye: the linux-embedded-hal. It occurred to me that being able to prototype on an embedded Linux system using linux-embedded-hal and then use the same API on a real-time OS or bare-metal system would be very convenient.
A multi-platform experiment
Keeping with this blog’s tradition let’s imagine we’ve been tasked to build a device to perform the mission-critical function of displaying four gliders flying in formation in across a 128x64 pixel screen.
Suppose that the “hardware team” selected the SDD1306 OLED display. We know up-front that we’re going to use embedded-hal, so we choose the embedded-graphics crate, and the sdd1306 driver crate that implements an embedded-graphics compatible draw target.
The no_std Game Of Life
The “application logic” is contained in it’s own crate with the #![no_std] attribute. The API is fairly simple:
let mut col = Colony::new();

seed_gliders(&mut col);

loop {
  col = generation(col);
  for (x, y) in col.iter() {
    // Draw pixel at x,y
  }
}
Our implementation relies on containers from the #![no_std] heapless crate to avoid heap allocation.
Simulating the simulation
The semiconductor shortage has ruined our imaginary project schedule…
We take drastic action and decide to build an SDL simulator with the embedded-graphics-simulator crate:
const TARGET_FPS: u32 = 20;

fn main() {
    let mut display = SimulatorDisplay::<BinaryColor>::new(Size::new(128_u32, 64_u32));
    let output_settings = OutputSettingsBuilder::new()
        .theme(BinaryColorTheme::OledBlue)
        .build();
    let mut window = Window::new("Conway's Game Of Life", &output_settings);

    let mut col = Colony::new();

    seed_gliders(&mut col);

    let frame_render_time = Duration::from_secs(1) / TARGET_FPS;

    'outer: loop {
        let start = Instant::now();
        col = generation(col);
        display.clear(BinaryColor::Off).unwrap();
        for cell in &col {
            Pixel(Point::new(cell.0 as i32, cell.1 as i32), BinaryColor::On)
                .draw(&mut display)
                .unwrap();
        }
        window.update(&display);
        let duration = start.elapsed();

        if duration < frame_render_time {
            let sleep_time = frame_render_time - duration;
            thread::sleep(sleep_time);
        }

        // Must service window events, otherwise the SDL window freezes
        for event in window.events() {
            if event == SimulatorEvent::Quit {
                break 'outer;
            }
        }
    }
}
This is what it looks like on my laptop:
Pretty cool. Now onto some embedded systems:
Common I2C layer
Since we know we’ll be speaking to the real display module via a generic I2C interface, we can put the I2C adaptor code in it’s own crate:
pub fn life_i2c<DI: WriteOnlyDataCommand>(interface: DI) -> ! {
    let mut display = Ssd1306::new(interface, DisplaySize128x64, DisplayRotation::Rotate0)
        .into_buffered_graphics_mode();
    display.init().unwrap();

    let mut col = Colony::new();

    seed_gliders(&mut col);

    loop {
        col = generation(col);
        display.clear();
        for (x, y) in col.iter() {
            Pixel(Point::new(*x as i32, *y as i32), BinaryColor::On)
                .draw(&mut display)
                .unwrap();
        }
        display.flush().unwrap();
    }
}
I2C on Linux
The SD1306 is wired up to the I2C0 bus of a Raspberry Pi running Linux. With the generic I2C interface, the Linux version of the code is now dead simple:
fn main() {
    let i2c = I2cdev::new("/dev/i2c-0").unwrap();
    let interface = I2CDisplayInterface::new(i2c);
    life_hal::life_i2c(interface);
}
No surprise, it works:
STM32 (maple mini clone)
Finally we receive the development hardware and get down to integration!
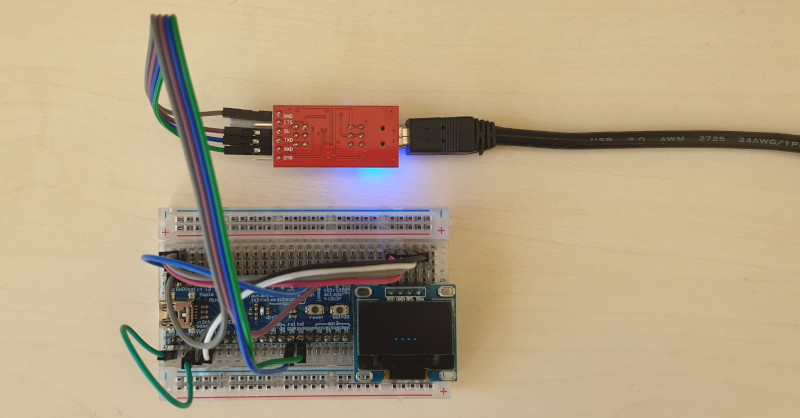
Production hardware…
This is where we’re reminded that operating systems abstract away a lot of tedious details. On bare-metal we have to configure the hardware for I2C which is a bit of a faff compared to the Raspberry Pi version:
fn main() -> ! {
    let dp = stm32::Peripherals::take().unwrap();

    let mut flash = dp.FLASH.constrain();
    let mut rcc = dp.RCC.constrain();

    let clocks = rcc.cfgr.freeze(&mut flash.acr);

    let mut afio = dp.AFIO.constrain(&mut rcc.apb2);

    let mut gpiob = dp.GPIOB.split(&mut rcc.apb2);

    let scl = gpiob.pb6.into_alternate_open_drain(&mut gpiob.crl);
    let sda = gpiob.pb7.into_alternate_open_drain(&mut gpiob.crl);

    let i2c = BlockingI2c::i2c1(
        dp.I2C1,
        (scl, sda),
        &mut afio.mapr,
        Mode::Fast {
            frequency: 400_000.hz(),
            duty_cycle: DutyCycle::Ratio2to1,
        },
        clocks,
        &mut rcc.apb1,
        1000,
        10,
        1000,
        1000,
    );

    let interface = I2CDisplayInterface::new(i2c);
    life_hal::life_i2c(interface);
}
Thanks to our work with the simulator and the Raspberry Pi, we know that as long as I2C works, we’re home free:
Conclusion
You can grab a copy of the code on Github: https://github.com/simeonmiteff/embedded-life.
Here are some final thoughts:
The good things
The combination of Rust’s growing library ecosystem and the #![no_std] crate-level attribute makes re-using existing code in embedded code easy. Case in point: much of the heavy lifting in embedded-life is done by crates written by James Waples.
The rough edges
cargo’s workspaces don’t seem to work well with mixed target architecture crates. Some have suggested make or cargo make at the top level but I just went with a script.
Unlike the simulated version, the I2C adaptor doesn’t attempt to limit the display updates to a maximum FPS. I left it this way to get a feeling for the code’s performance. Did you notice how much slower the Raspberry Pi version is compared to the bare-metal version? I suspect this has something to do with the configuration of the Linux I2C driver for the Broadcom SOC.
Future work
In future I’d like to explore methods for hardware/software co-design based on modelling and simulation. Stay tuned 😊